How to Build an Animated Teddy Bear Sign Up Form with HTML, CSS and JavaScript
Published November 4, 2026 · 11 min read
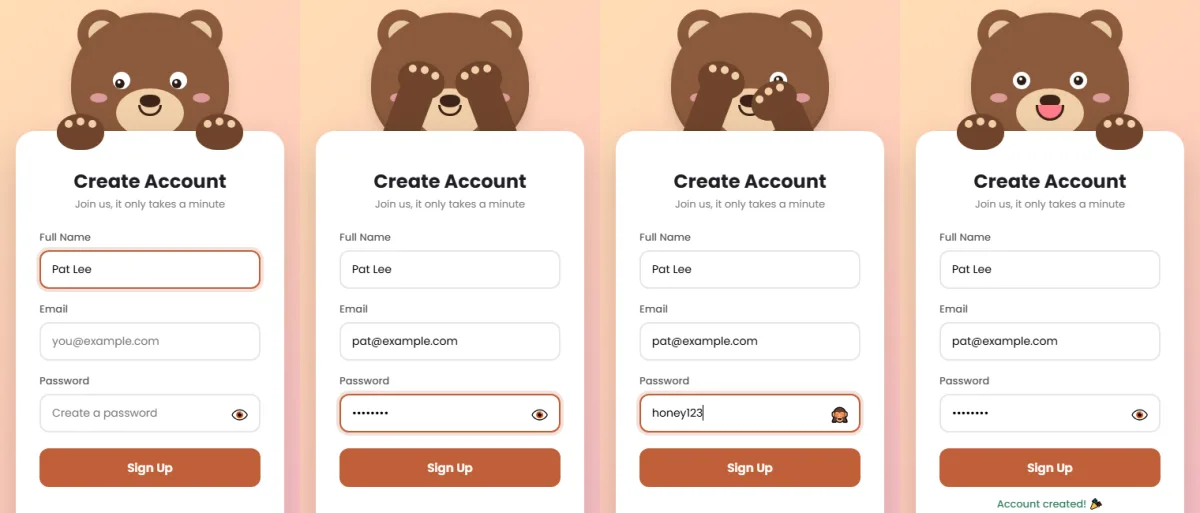
Sign up forms ask people for the most effort: a name, an email and a brand new password. A little personality goes a long way here. In this tutorial we'll build a sign up form held by a teddy bear. It reads along as you type your name and email, politely covers its eyes while you choose a password, peeks if you show it, and does a happy dance when the account is created.
Everything is built with HTML, CSS and
JavaScript in three small files. There are no images and no libraries: the bear
is made of rounded <div>s.
What makes this one different
If you've followed our panda login tutorial, the bear moves the same way. This project goes further on the form side:
- Three fields instead of two. The bear watches every text field and hides from every password field, without one line of code per field.
- Data attributes drive the behaviour. Add
data-tto a field and the bear reads it. Adddata-pwand the bear covers its eyes. - A reusable validation function that finds the first problem (empty field, bad email, or passwords that don't match) and marks that field for screen readers.
- A muzzle layer and colour variables that turn the same shapes into a bear.
Project setup
bear-signup/
├── index.html   ← the bear and the form
├── style.css    ← shapes, colours and animation
└── script.js    ← watching, hiding, checking
Create the three files in one folder and open index.html in your browser. Each block
below has a Copy button.
Step 1: The HTML
<!DOCTYPE html>
<html lang="en">
<head>
  <meta charset="UTF-8">
  <meta name="viewport" content="width=device-width, initial-scale=1.0">
  <title>Bear Sign Up</title>
  <link rel="preconnect" href="https://fonts.googleapis.com">
  <link rel="preconnect" href="https://fonts.gstatic.com" crossorigin>
  <link href="https://fonts.googleapis.com/css2?family=Poppins:wght@400;500;600;700&display=swap" rel="stylesheet">
  <link rel="stylesheet" href="style.css">
</head>
<body>

  <div class="scene" id="scene">
    <!-- The bear is decoration, so screen readers skip it -->
    <div class="head" aria-hidden="true">
      <div class="ear l"></div>
      <div class="ear r"></div>
      <div class="face">
        <div class="muzzle"></div>
        <div class="patch l"><div class="eye"><div class="pupil"></div></div></div>
        <div class="patch r"><div class="eye"><div class="pupil"></div></div></div>
        <div class="blush l"></div>
        <div class="blush r"></div>
        <div class="nose"></div>
        <div class="mouth"></div>
      </div>
    </div>

    <div class="arm l" aria-hidden="true"></div>
    <div class="arm r" aria-hidden="true"></div>
    <div class="paw l" aria-hidden="true"><i></i><i></i><i></i></div>
    <div class="paw r" aria-hidden="true"><i></i><i></i><i></i></div>

    <form class="card" id="form" novalidate>
      <h2>Create Account</h2>
      <p class="sub">Join us, it only takes a minute</p>

      <div class="field">
        <label for="name">Full Name</label>
        <input type="text" id="name" name="name" autocomplete="name" data-t placeholder="Your full name">
      </div>

      <div class="field">
        <label for="email">Email</label>
        <input type="email" id="email" name="email" autocomplete="email" data-t placeholder="you@example.com">
      </div>

      <div class="field">
        <label for="password">Password</label>
        <input type="password" id="password" name="password" autocomplete="new-password" data-pw placeholder="Create a password">
        <button type="button" class="toggle" aria-label="Show password" aria-pressed="false">👁️</button>
      </div>

      <button type="submit" class="btn">Sign Up</button>
      <div class="msg" id="msg" role="status" aria-live="polite"></div>
    </form>

    <div class="foot l" aria-hidden="true"><i></i><i></i><i></i><b></b></div>
    <div class="foot r" aria-hidden="true"><i></i><i></i><i></i><b></b></div>
  </div>

  <script src="script.js"></script>
</body>
</html>
The page has one wrapper, #scene, holding the bear's parts and the form. The order
matters for layering. From back to front: head, arms, paws, form, feet. CSS
z-index fine-tunes it later.
The face is built in layers
Inside .face, the .muzzle comes first, so it sits behind the
eyes, nose and mouth that follow it. In HTML, later elements are painted on top of earlier ones
when they overlap. That's an easy way to stack a face without any z-index.
The form fields
data-ton Full Name and Email marks them as fields the bear should watch.data-pwon the password marks it as one to hide from. These are custom data attributes. Any attribute starting withdata-is valid HTML, and JavaScript can find elements by it.- Autocomplete hints help browsers and password managers fill the form:
autocomplete="name",autocomplete="email"and, most importantly,autocomplete="new-password". That last one tells password managers this is a sign up, so they offer to generate a strong password instead of filling an old one. novalidateswitches off the browser's built-in error bubbles, because the bear will deliver the feedback instead.role="status"on the message makes screen readers announce “Account created!” or the error as soon as it appears.aria-hidden="true"on every bear part keeps screen readers focused on the form.
Step 2: The CSS
2.1 Colours as variables
:root {
  --bg: linear-gradient(135deg, #ffe0b2 0%, #ffccbc 55%, #f8bbd0 100%);
  --fur: #8b5a3c;      /* head and ears */
  --body: #6f442c;     /* arms, paws and feet (a shade darker) */
  --pad: #f0cfa8;      /* muzzle, inner ears, toe beans */
  --ink: #3e2418;      /* nose and mouth */
  --accent: #c0603a;   /* button and focus ring */
  --px: 0px;           /* pupil x, set by JavaScript */
  --py: 0px;           /* pupil y */
}
* { box-sizing: border-box; margin: 0; padding: 0; }
body {
  min-height: 100vh;
  display: grid;
  place-items: center;
  padding: 24px 16px 56px;
  background: var(--bg);
  font-family: 'Poppins', sans-serif;
  overflow-x: hidden;
}
Every colour of the bear lives in :root with a name that says what it's for:
--fur for the head, a slightly darker --body for the arms and feet,
--pad for the light muzzle and toe beans. Using two browns instead of one is a small
trick that makes the arms read as being in front of the head.
Want a polar bear? Change --fur to #f4f4f4, --body to
#e2e2e2 and --pad to #c9c9c9. Nothing else needs to
change.
2.2 The scene
.scene {
  position: relative;
  width: 340px;
  padding-top: 150px;
  margin-bottom: 40px;
}
@media (max-width: 370px) {
  body { padding-left: 12px; padding-right: 12px; }
  .scene { zoom: .86; }
}
.scene is position: relative, so every bear part can be placed with
position: absolute measured from its corner. padding-top: 150px leaves
room above the form for the head. On very narrow phones, zoom shrinks everything
evenly, so the paws still land exactly on the eyes.
2.3 Head, ears and muzzle
.head {
  position: absolute;
  top: 0; left: 50%;
  width: 200px; height: 180px;
  margin-left: -100px;
  z-index: 1;
}
.ear {
  position: absolute;
  top: -4px;
  width: 62px; height: 62px;
  background: var(--fur);
  border-radius: 50%;
}
.ear::after {
  content: '';
  position: absolute;
  inset: 14px;
  background: var(--pad);
  border-radius: 50%;
}
.ear.l { left: 8px; }
.ear.r { right: 8px; }
.face {
  position: absolute;
  inset: 0;
  background: var(--fur);
  border-radius: 50% 50% 46% 46%;
  box-shadow: 0 6px 18px rgba(0,0,0,.15), inset 0 -8px 0 rgba(0,0,0,.08);
}
.muzzle {
  position: absolute;
  top: 96px; left: 50%;
  width: 86px; height: 62px;
  margin-left: -43px;
  background: var(--pad);
  border-radius: 50%;
}
A teddy bear is mostly circles:
- Ears are two 62px circles.
.ear::afteradds a lighter inner circle without needing extra HTML.inset: 14pxmeans “14px in from every side”. - The head uses
border-radius: 50% 50% 46% 46%, which makes the bottom corners a bit less round, for chubby cheeks. - The muzzle is a wide, light oval, centred with
left: 50%plus a negative margin of half its width. This is the shape that makes it read as a bear rather than a panda. - Depth: the
insetbox-shadow darkens the bottom edge of the head slightly, giving it a 3D feel.
2.4 Eyes that move and blink
.patch {
  position: absolute;
  top: 55px;
  width: 52px; height: 62px;
  display: grid;
  place-items: center;
}
.patch.l { left: 38px; }
.patch.r { right: 38px; }
.eye {
  position: relative;
  width: 22px; height: 22px;
  background: #fff;
  border-radius: 50%;
  overflow: hidden;
  animation: blink 4.5s infinite;
}
.pupil {
  position: absolute;
  top: 50%; left: 50%;
  width: 12px; height: 12px;
  margin: -6px 0 0 -6px;
  background: #2b1b14;
  border-radius: 50%;
  transform: translate(var(--px), var(--py));
  transition: transform .15s ease;
}
.pupil::after {
  content: '';
  position: absolute;
  top: 2px; left: 3px;
  width: 4px; height: 4px;
  background: #fff;
  border-radius: 50%;
}
@keyframes blink {
  0%, 92%, 100% { transform: scaleY(1); }
  95% { transform: scaleY(.1); }
}
The pupil is positioned with transform: translate(var(--px), var(--py)). JavaScript
changes those two variables, and the .15s transition makes the eyes glide. The white
dot (::after) is a reflection that makes the eyes look alive. Blinking is a keyframe
that squashes the eye flat for a moment near the end of every 4.5-second loop.
2.5 Nose, mouth and cheeks
.nose {
  position: absolute;
  top: 104px; left: 50%;
  width: 26px; height: 16px;
  margin-left: -13px;
  background: var(--ink);
  border-radius: 50% 50% 60% 60%;
}
.mouth {
  position: absolute;
  top: 117px; left: 50%;
  width: 30px; height: 14px;
  margin-left: -15px;
  border: 3px solid var(--ink);
  border-top: none;
  border-radius: 0 0 20px 20px;
  transition: all .3s ease;
}
.blush {
  position: absolute;
  top: 102px;
  width: 22px; height: 12px;
  background: #ffb3c1;
  border-radius: 50%;
  opacity: .7;
}
.blush.l { left: 24px; }
.blush.r { right: 24px; }
The mouth is a box with only three borders, plus rounded bottom corners, which leaves a smile
shaped like a “U”. Because it has transition: all, it changes smoothly
when the bear is happy or sad.
2.6 Arms and paws
.arm {
  position: absolute;
  top: 75px;
  width: 44px; height: 145px;
  background: var(--body);
  border-radius: 22px;
  transform-origin: 50% 100%;
  transform: scaleY(.5);
  z-index: 2;
  transition: transform .45s cubic-bezier(.68, -0.35, .27, 1.35);
}
.arm.l { left: 60px; }
.arm.r { right: 60px; }
.paw {
  position: absolute;
  top: 128px;
  width: 60px; height: 46px;
  background: var(--body);
  border-radius: 50% 50% 45% 45%;
  z-index: 4;
  transition: transform .45s cubic-bezier(.68, -0.35, .27, 1.35);
}
.paw.l { left: 52px; }
.paw.r { right: 52px; }
.paw i {
  position: absolute;
  top: 8px;
  width: 10px; height: 10px;
  background: var(--pad);
  border-radius: 50%;
}
.paw i:nth-child(1) { left: 10px; }
.paw i:nth-child(2) { left: 25px; top: 5px; }
.paw i:nth-child(3) { left: 40px; }
Each arm is a tall rounded bar with transform-origin: 50% 100%. That puts the pivot at
the bottom, like a shoulder. scaleY(.5) keeps it short and tucked behind the form
until it's needed. The cubic-bezier(.68,-0.35,.27,1.35) timing overshoots a little,
so the arms move with a soft bounce.
2.7 The form card
.card {
  position: relative;
  z-index: 3;
  background: #fff;
  border-radius: 24px;
  padding: 46px 30px 30px;
  box-shadow: 0 20px 50px rgba(0,0,0,.18);
}
.card h2 { text-align: center; color: #1f1f24; font-weight: 700; margin-bottom: 2px; }
.card p.sub { text-align: center; color: #767676; font-size: 13px; margin-bottom: 22px; }
.field { position: relative; margin-bottom: 16px; }
.field label { display: block; font-size: 13px; font-weight: 500; color: #555; margin-bottom: 6px; }
.field input {
  width: 100%;
  padding: 12px 44px 12px 14px;
  border: 2px solid #e6e6e6;
  border-radius: 12px;
  font: inherit;
  font-size: 14px;
  outline: none;
  transition: border-color .2s, box-shadow .2s;
}
.field input:focus {
  border-color: var(--accent);
  box-shadow: 0 0 0 4px color-mix(in srgb, var(--accent) 18%, transparent);
}
.field input[aria-invalid="true"] { border-color: #d64545; }
.toggle {
  position: absolute;
  right: 10px; bottom: 9px;
  padding: 4px;
  border: none;
  border-radius: 6px;
  background: none;
  font-size: 18px;
  line-height: 1;
  cursor: pointer;
}
.toggle:focus-visible { outline: 2px solid var(--accent); }
.btn {
  width: 100%;
  margin-top: 4px;
  padding: 13px;
  border: none;
  border-radius: 12px;
  background: var(--accent);
  color: #fff;
  font: inherit;
  font-weight: 600;
  font-size: 15px;
  cursor: pointer;
  transition: transform .15s, filter .2s;
}
.btn:hover { filter: brightness(.92); }
.btn:active { transform: scale(.97); }
.btn:focus-visible { outline: 3px solid #1f1f24; outline-offset: 2px; }
.msg { text-align: center; font-size: 13px; margin-top: 12px; min-height: 18px; font-weight: 500; }
A few details:
color-mix(in srgb, var(--accent) 18%, transparent)creates a soft focus ring from the accent colour, so the ring always matches the button when you change the theme.input[aria-invalid="true"]turns a field's border red. JavaScript sets that attribute on the field with the problem, so the same attribute helps screen reader users and sighted users.- The password input has extra right padding so typing never runs under the eye button.
2.8 Feet
.foot {
  position: absolute;
  bottom: -32px;
  width: 72px; height: 52px;
  background: var(--body);
  border-radius: 50%;
  z-index: 1;
}
.foot.l { left: 62px; }
.foot.r { right: 62px; }
.foot b {
  position: absolute;
  left: 50%; bottom: 8px;
  width: 26px; height: 18px;
  margin-left: -13px;
  background: var(--pad);
  border-radius: 50%;
}
.foot i {
  position: absolute;
  bottom: 28px;
  width: 9px; height: 9px;
  background: var(--pad);
  border-radius: 50%;
}
.foot i:nth-of-type(1) { left: 18px; }
.foot i:nth-of-type(2) { left: 31px; bottom: 31px; }
.foot i:nth-of-type(3) { left: 44px; }
Ovals with a big pad (<b>) and three toes (<i>), hanging
below the card with a negative bottom.
2.9 The states
/* Typing in a text field: look down at the form */
.scene.look { --py: 4px; }

/* Typing a password: both paws over the eyes */
.scene.cover .arm.l { transform: rotate(21deg) scaleY(1); }
.scene.cover .arm.r { transform: rotate(-21deg) scaleY(1); }
.scene.cover .paw.l { transform: translate(52px, -66px) rotate(18deg); }
.scene.cover .paw.r { transform: translate(-52px, -66px) rotate(-18deg); }

/* Password shown: the right paw lifts to peek */
.scene.cover.peek .arm.r { transform: rotate(-24deg) scaleY(.82); }
.scene.cover.peek .paw.r { transform: translate(-58px, -40px) rotate(-30deg); }

/* Success: big smile, bounce, happy feet */
.scene.happy .mouth { width: 36px; height: 20px; margin-left: -18px; background: #ff7a8a; }
.scene.happy .foot { animation: tap .35s ease 3; }
.scene.happy .head { animation: bounce .5s ease 2; }
@keyframes tap { 50% { transform: translateY(-8px); } }
@keyframes bounce { 50% { transform: translateY(-10px); } }

/* Problem: frown and head shake */
.scene.sad .mouth {
  top: 123px;
  border-top: 3px solid var(--ink);
  border-bottom: none;
  border-radius: 20px 20px 0 0;
}
.scene.sad .head { animation: shake .45s ease; }
@keyframes shake {
  20%, 60% { transform: translateX(-8px) rotate(-3deg); }
  40%, 80% { transform: translateX(8px) rotate(3deg); }
}
This is the heart of the animation. JavaScript only adds a class to .scene, and these
rules do the rest:
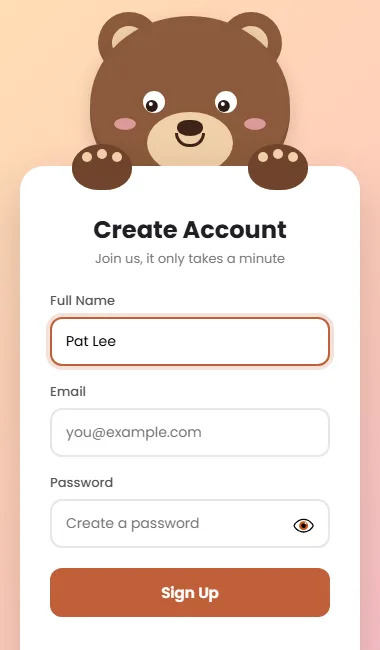
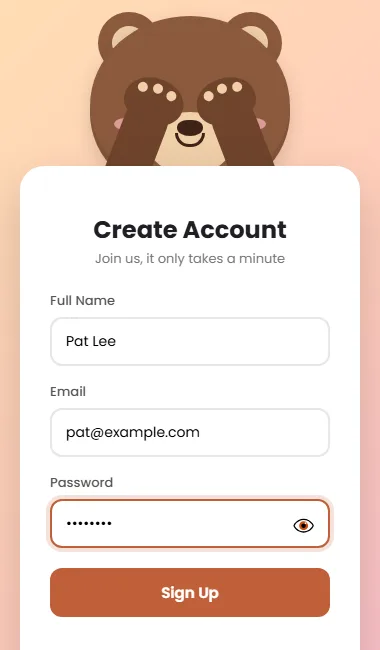
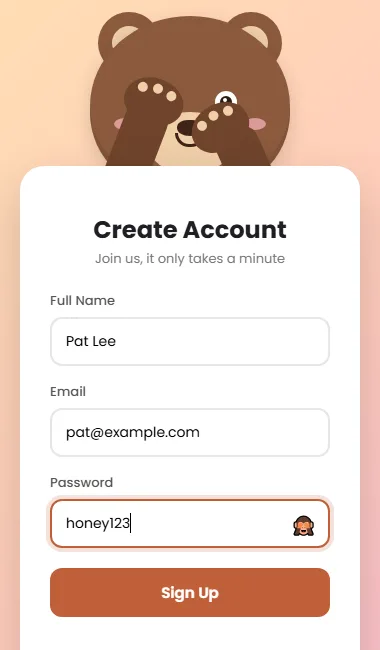
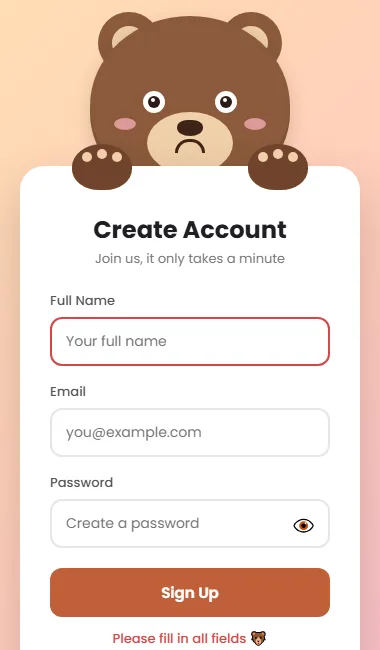
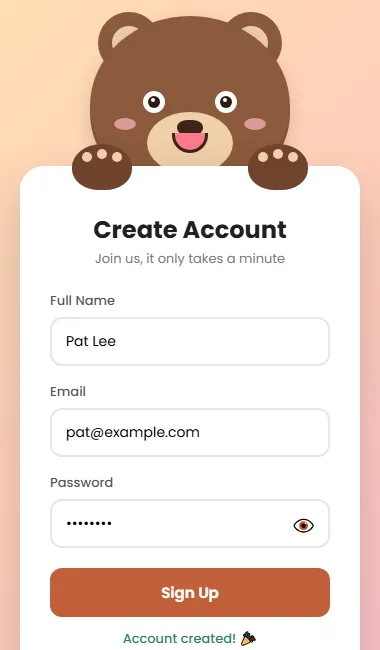
looksets--py: 4px, so the pupils point down at the form.coverswings both arms up (rotate + full height) and moves the paws onto the eyes.cover.peeklowers only the right arm and paw, so one eye peeks out.happyopens the mouth into a pink smile, bounces the head and taps the feet.sadflips the smile upside down and shakes the head.
2.10 Reduced motion
@media (prefers-reduced-motion: reduce) {
  *, *::before, *::after {
    animation-duration: .01ms !important;
    animation-iteration-count: 1 !important;
    transition-duration: .01ms !important;
  }
}
People who switch off animations in their system settings still see every state change, just without the movement.
Step 3: The JavaScript
3.1 Settings and elements
const SUCCESS = 'Account created! 🎉';
const EMOJI = '🐻';const scene = document.getElementById('scene');
const form = document.getElementById('form');
const msg = document.getElementById('msg');
const texts = [...form.querySelectorAll('input[data-t]')]; // fields the bear watches
const pws = [...form.querySelectorAll('input[data-pw]')]; // fields the bear hides from
let resetTimer;The success text and emoji sit at the very top, so you can reuse this script for any animal by changing two lines.
Then the important part: querySelectorAll('input[data-t]') collects every field with
a data-t attribute, and [data-pw] collects every password. The
[...] spread turns the result into a normal array, so we can use
forEach, find and some on it. Add a field to the HTML with
the right attribute, and the bear handles it automatically.
3.2 Watching the text fields
// The longer the text, the further right the pupils move (-5px to +5px).
function follow(input) {
  const len = Math.min(input.value.length, 25);
  scene.style.setProperty('--px', (-5 + (len / 25) * 10) + 'px');
}

texts.forEach((input) => {
  input.addEventListener('focus', () => {
    scene.classList.remove('cover', 'peek');
    scene.classList.add('look');
    follow(input);
  });
  input.addEventListener('input', () => {
    if (document.activeElement === input) follow(input); // ignore autofill
  });
  input.addEventListener('blur', () => {
    scene.classList.remove('look');
    scene.style.setProperty('--px', '0px');
  });
});
follow() maps the text length (0 to 25 characters) onto a pupil position from
-5px to +5px, so the eyes drift right as you type, like reading. Each
field gets three listeners in one loop:
- focus: drop any cover, switch to
look, and place the pupils. - input: move the pupils as you type. Checking
document.activeElement === inputignores a browser autofill happening in the background. - blur: stop looking and centre the eyes.
Moving from Full Name to Email works naturally: the first field's blur fires, then
the second field's focus starts reading again from the left.
3.3 Hiding from passwords
pws.forEach((input) => {
  const toggle = input.parentElement.querySelector('.toggle');
  const uncover = () => scene.classList.remove('cover', 'peek');

  input.addEventListener('focus', () => {
    scene.classList.add('cover');
    scene.classList.toggle('peek', input.type === 'text');
  });
  // Moving between the password and its eye button keeps the paws up
  input.addEventListener('blur', (e) => {
    if (e.relatedTarget !== toggle) uncover();
  });
  toggle.addEventListener('blur', (e) => {
    if (e.relatedTarget !== input) uncover();
  });

  toggle.addEventListener('mousedown', (e) => e.preventDefault()); // keep focus in the input
  toggle.addEventListener('click', () => {
    const show = input.type === 'password';
    input.type = show ? 'text' : 'password';
    toggle.textContent = show ? '🙈' : '👁️';
    toggle.setAttribute('aria-label', show ? 'Hide password' : 'Show password');
    toggle.setAttribute('aria-pressed', String(show));
    input.focus();
    scene.classList.add('cover');
    scene.classList.toggle('peek', show); // one paw lifts to peek
  });
});
Each password finds its own eye button with
input.parentElement.querySelector('.toggle'). That's why this works for a second
“Confirm password” field too.
- On focus, the bear covers its eyes. If the password is already visible, it goes straight to peeking.
- The two blur listeners use
e.relatedTarget(the element receiving focus next). Moving between a password and its own eye button keeps the paws up. Moving anywhere else lowers them, including tabbing past the button with the keyboard. - The mousedown listener with
preventDefault()stops a mouse click on the eye from stealing focus from the input. - On click, the input switches between
passwordandtext, the emoji swaps, andaria-labelandaria-pressedtell screen readers whether the password is showing.
3.4 Checking the form
const EMAIL = /^[^\s@]+@[^\s@]+\.[^\s@]{2,}$/;

// Returns the first problem as { input, text }, or null if all is well
function findProblem() {
  const inputs = [...form.querySelectorAll('input')];
  const empty = inputs.find((i) => !i.value.trim());
  if (empty) return { input: empty, text: 'Please fill in all fields' };

  const badEmail = inputs.find((i) => i.type === 'email' && !EMAIL.test(i.value.trim()));
  if (badEmail) return { input: badEmail, text: 'Please enter a valid email' };

  if (pws.length > 1 && pws[0].value !== pws[1].value) {
    return { input: pws[1], text: "Passwords don't match" };
  }
  return null;
}
findProblem() returns the first thing that's wrong, or null.
It checks in order:
- Any empty field, using
findon the list of inputs. - An email that doesn't match the pattern something@something.something.
- If there are two password fields, that they match.
Returning both the input and the message keeps the submit code simple, because it knows exactly which field to mark.
3.5 Submitting
form.addEventListener('submit', (e) => {
  e.preventDefault();
  clearTimeout(resetTimer);
  scene.classList.remove('happy', 'sad', 'cover', 'peek', 'look');
  form.querySelectorAll('[aria-invalid]').forEach((i) => i.removeAttribute('aria-invalid'));
  if (document.activeElement) document.activeElement.blur();
  void scene.offsetWidth; // force a reflow so the animation can replay

  const problem = findProblem();
  if (!problem) {
    scene.classList.add('happy');
    msg.style.color = '#2e7d5b';
    msg.textContent = SUCCESS;
    // In a real app, send the form to your server here.
  } else {
    scene.classList.add('sad');
    msg.style.color = '#d64545';
    msg.textContent = problem.text + ' ' + EMOJI;
    problem.input.setAttribute('aria-invalid', 'true');
  }
  resetTimer = setTimeout(() => scene.classList.remove('happy', 'sad'), 2000);
});
Step by step:
preventDefault()stops the page from reloading.clearTimeoutcancels the previous reset, so clicking twice quickly doesn't cut the new animation short.- All state classes and old
aria-invalidmarks are cleared. - The focused field is blurred, so the bear lowers its paws and looks at you.
void scene.offsetWidthforces the browser to apply those removals first, so the happy or sad animation can play again even if it just played.- Then it's happy with the success message, or sad with the problem text and that field marked invalid. After two seconds, the bear relaxes.
Add a “Confirm password” field
Because the script works from data attributes, adding a second password needs only HTML. Paste this after the password field:
<div class="field">
  <label for="password2">Confirm Password</label>
  <input type="password" id="password2" name="password2"
         autocomplete="new-password" data-pw placeholder="Type it again">
  <button type="button" class="toggle" aria-label="Show password" aria-pressed="false">👁️</button>
</div>
The bear now hides from both password fields. findProblem() already compares
pws[0] and pws[1], so it says “Passwords don't match” when
they differ.
Test it yourself
- Click Full Name and type. The bear reads from left to right.
- Move to Email. Its eyes jump back to the start.
- Click Password. Paws over the eyes.
- Click 👁️. One paw lowers and the bear peeks.
- Press Tab past the eye button to Sign Up. The paws come down.
- Submit with empty fields, then with
bear@as the email. Each time the bear frowns, and the right field turns red. - Fill everything in properly and submit. Happy bear!
Before using it for real sign ups
- Validate on the server too. JavaScript checks are a convenience. Anyone can bypass them, so your back end must check the name, email and password again.
- Send the data over HTTPS with
method="post", or usefetch()where the comment in the submit handler says so. - Show server errors with the bear, for example “That email is already
registered”, by adding the
sadclass and settingaria-invalidon the email field. - Let password managers help. Keep
autocomplete="new-password", and never block pasting into password fields.
Share what you built
Made your own bear? Take a screenshot and share it as a link with sshot.online, or paste your code into the free code sharing tool to ask for help. No sign up needed (the irony isn't lost on us).
Conclusion
You've built a sign up form with a friendly bear that responds to every field, and you've learned a pattern that scales: mark elements with data attributes, then handle all of them in one loop. The same approach works for any number of fields, and changing a few colour variables turns the bear into a completely different character. Try a polar bear or a panda next, using our panda login as a guide.
Frequently asked questions
How does the bear know which fields to watch?
Text fields have a data-t attribute and password fields have data-pw.
JavaScript collects them with querySelectorAll and adds the same listeners to each
one, so any field with the right attribute works automatically.
Can I add a confirm password field?
Yes. Add a second password field with data-pw and its own eye button. The bear
hides from it, and the validation already checks that the two passwords match.
Why use autocomplete="new-password" on a sign up form?
It tells browsers and password managers that the user is creating a password, so they offer to generate and save a strong one instead of filling in an existing password.
How do I change the bear into a different animal?
Change the colour variables in :root for a different bear, or change the ear,
muzzle and eye styles for a different animal. The arms, paws, states and JavaScript stay the
same.
Is the JavaScript validation enough?
No. It gives quick feedback, but your server must validate everything again, because browser checks can be turned off or bypassed.
Related articles
How to Build an Animated Panda Login Page with HTML, CSS and JavaScript
A step-by-step tutorial: build a login form where a CSS panda follows your typing, covers its eyes for the password, peeks, and reacts. Full code and live demo.
Read More →
How to Build a Cute Cat Login Page with HTML, CSS and JavaScript
Draw a tabby cat in CSS with clip-path ears, slit pupils and whiskers, then make it watch your email and cover its eyes for the password.
Read More →
How to Build a Night Owl Login Page with HTML, CSS and JavaScript
A dark-themed login page with a CSS owl that hides behind its wings for the password, under a starry sky made entirely of gradients.
Read More →